Introduction:
Soda Cake, a marvel of simplicity and flavor, offers a delightful treat for dessert enthusiasts and busy cooks alike. With just two ingredients—cake mix and soda—this recipe defies conventional baking methods while delivering a moist and flavorful cake that’s sure to impress. In this SEO article, we’ll delve into the fascinating world of Soda Cake, uncovering its secrets and celebrating its versatility in creating delicious desserts with minimal effort.
Ingredients:
Cake:
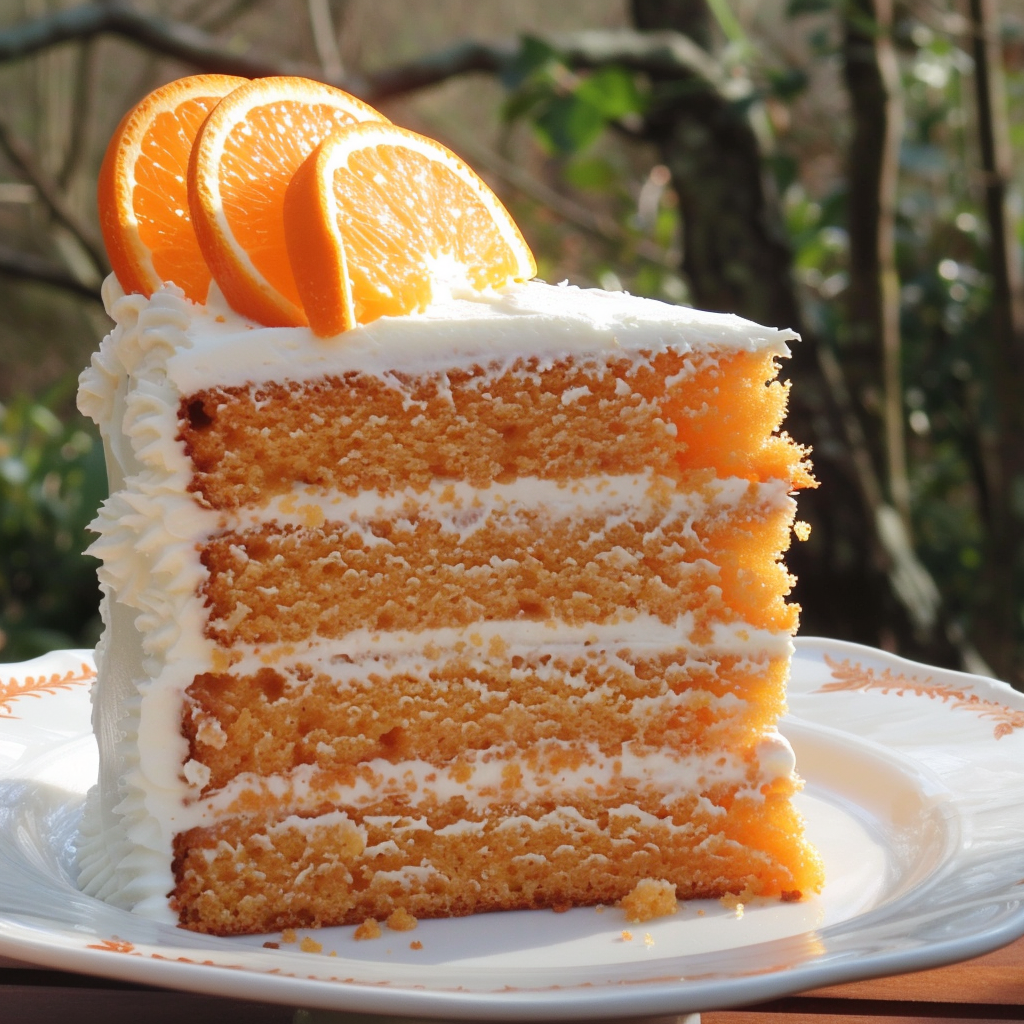
- 15.25 ounces vanilla cake mix
- 12 ounces orange soda
- 1 teaspoon pure orange extract
- 24 ounces whipped white frosting, (two 12-ounce containers)
- 2 to 3 drops orange gel food color
Instructions:
- Preheat the oven to 350°F. Line two 9-inch round cake pans with parchment circles, and lightly spray with baking spray (Baker’s Joy or a generic version). Set them aside.
- Add the cake mix to a medium-sized mixing bowl.
- Pour the orange soda over the cake mix.
- Add the orange extract.
- Use a handheld mixer on medium-low speed and mix for 1 to 1½ minutes until completely combined and smooth.
- Evenly divide the cake batter between the 2 prepared cake pans. Bake for 22 to 24 minutes, or until a toothpick inserted comes away clean. Allow the cakes to completely cool.
- Once the cakes have cooled, place half of 1 of the containers of whipped frosting into a small mixing bowl. Add 2 to 3 drops of the orange gel food color. Stir well until the color is uniform. Set it aside.
- Remove 1 of the cakes from the cake pan and place on a serving dish.
- Spoon the remaining ½ of the opened frosting container onto the cake. Using a silicone spatula or an offset spatula, spread the frosting evenly over the top of the cake.
- Carefully place the second cake layer on top of the bottom layer.
- Using the silicone spatula or the offset spatula, evenly spread the second container of whipped frosting over the top and sides of the cake.
- Using a decorator’s bag fitted with a star-shaped decorator’s tip, or a quart-size Ziploc with a small corner of the bag snipped off, hold the bag ½ inch above the surface of the outer edge of the cake. Using even pressure squeeze the bag in a circle to form a small rose shape. Repeat the pattern around the cak
Serving Tips:
- Slice and Serve: Once the Soda Cake has cooled completely, slice it into individual portions using a sharp knife or cake slicer. For a polished presentation, dust the slices with powdered sugar or cocoa powder before serving.
- Pair with Whipped Cream: Serve each slice of Soda Cake with a dollop of freshly whipped cream or a scoop of vanilla ice cream for a delightful contrast of flavors and textures.
- Garnish Creatively: Elevate the presentation of the Soda Cake by garnishing each slice with fresh berries, mint leaves, or a drizzle of chocolate sauce. This not only adds visual appeal but also enhances the flavor profile of the dessert.
- Serve with Coffee or Tea: Accompany the Soda Cake with a steaming cup of coffee or a fragrant pot of tea for a cozy and comforting dessert experience.
Storage Tips:
- Room Temperature Storage: Store leftover Soda Cake in an airtight container or cover it tightly with plastic wrap at room temperature for up to 2-3 days. Be sure to store it in a cool, dry place away from direct sunlight and heat sources.
- Refrigeration: If you prefer to extend the shelf life of the Soda Cake, you can refrigerate it for up to 5-7 days. Place the cake in an airtight container to prevent it from drying out and absorbing any odors from the refrigerator.
- Freezing Instructions: To freeze Soda Cake for longer storage, wrap individual slices tightly in plastic wrap and aluminum foil or place them in freezer-safe containers. The cake can be frozen for up to 2-3 months. Thaw individual slices in the refrigerator overnight before serving.
- Reheating Instructions: If desired, you can reheat individual slices of Soda Cake in the microwave for a few seconds or in a preheated oven at a low temperature until warmed through. This helps restore the cake’s moisture and freshness for a delicious dessert experience.
FAQs:
1. Can I use any flavor of soda with any flavor of cake mix? Yes, Soda Cake is highly customizable, and you can mix and match flavors according to your preference. Experiment with different combinations to discover your favorite flavor pairings.
2. Can I substitute diet soda for regular soda in this recipe? While regular soda is traditionally used in Soda Cake recipes, you can substitute diet soda if you prefer. Just keep in mind that the sweetness level may vary, so adjust accordingly to achieve the desired taste.
3. Can I make Soda Cake without using a boxed cake mix? While boxed cake mix provides convenience, you can make Soda Cake from scratch by using a homemade cake batter recipe. Simply replace the liquid ingredients (such as water or milk) with an equal amount of soda.
4. Can I add other ingredients to the Soda Cake batter, such as chocolate chips or nuts? Absolutely! Adding chocolate chips, nuts, or other mix-ins to the Soda Cake batter can enhance its flavor and texture. Just be mindful of the amount of additional ingredients to maintain the cake’s consistency.
5. Can I use Soda Cake batter to make cupcakes instead of a cake? Yes, you can use Soda Cake batter to make cupcakes by portioning the batter into cupcake liners and baking them in a muffin tin. Adjust the baking time accordingly, as cupcakes typically require less time to bake than a full cake.
Conclusion:
In conclusion, Soda Cake is a true testament to the beauty of simplicity in baking. With just two ingredients and minimal effort, you can create a moist, flavorful cake that’s perfect for any occasion. Whether you’re a novice baker looking to impress or a seasoned pro seeking a quick and delicious dessert option, Soda Cake is sure to delight. So why wait? Grab your favorite cake mix and soda flavors and embark on a delicious baking adventure with Soda Cake today!